
I’ve written a book to teach you how to write unit tests effectively. If you want to make your tests fast so you’ll actually run them and run them often to receive immediate feedback, check out Effective Unit Testing. You’ll develop the confidence that your change will not break existing features, and never have to worry about introducing regression. Write non-fragile unit tests that are assets, not liabilities. Use TDD to write testable code that drives feature development.
Now that you’ve tested the interactor and presenter in the Clean Swift VIP cycle. It’s time to finish up with the star of the show.
Drum roll please… View Controller
You’re going to finally take down the massive view controller. Massive leads to a massive post. So I’ll break this post into two parts:
In part 1, you’ll see the familiar setup and spy. You’ll then write tests for the expiration date picker to make sure a date is formatted as desired. We’ll diverge to look at the new invisible UI component and how it comes into play when testing view controllers. Finally, you’ll finish up by writing tests for the shipping method picker.
In part 2, you’ll write tests to make sure the keyboard behave as expected in all edge cases in which the text fields become first responder. You’ll also learn how to make running tests the same as running the app. Finally, you’ll test to make sure the pickers are configured properly.
Let’s get started.
Create the XCTestCase for the view controller
In Xcode, choose File -> New -> File, then select Test Case Class. Enter CreateOrderViewControllerTests for class. Make sure the CleanStoreTests target is checked. Click Create. The CreateOrderViewControllerTests.swift file is created.
The CreateOrderViewController’s input and output protocols are defined as follows:
|
1 2 3 4 5 6 7 8 9 10 11 |
protocol CreateOrderViewControllerInput { func displayExpirationDate(viewModel: CreateOrder_FormatExpirationDate_ViewModel) } protocol CreateOrderViewControllerOutput { var shippingMethods: [String] { get } func formatExpirationDate(request: CreateOrder_FormatExpirationDate_Request) } |
Setup and Spy
With the interactor and presenter, setting up the subject under test is as simple as instantiating them, like CreateOrderInteractor() and CreateOrderPresenter(). In fact, the Clean Swift configurator creates them in the same way before hooking them up to the VIP cycle for real use. They are just POSO – Plain Old Swift Object – with no parent class.
However, CreateOrderViewController inherits, either directly or indirectly, from UIViewController. It is loaded from the storyboard instead of created programmatically. This loading does a lot of things behind the scenes. Building the view hierarchy. Setting up the responder chain. Displaying the view on the screen. Among others.
Simply instantiating a view controller with CreateOrderViewController() doesn’t really fully set it up, ready to be used or tested.
But if you were to do all these things manually, you would need to dig deep into Apple’s documentation on view and view controller life cycles.
Fortunately, you don’t have to do that. You can just load it from the storyboard when you are running tests as if you are running the app.
|
1 2 3 4 5 6 7 8 |
func setupCreateOrderViewController() { let bundle = NSBundle(forClass: self.dynamicType) let storyboard = UIStoryboard(name: "Main", bundle: bundle) createOrderViewController = storyboard.instantiateViewControllerWithIdentifier("CreateOrderViewController") as! CreateOrderViewController _ = createOrderViewController.view } |
You’ve seen similar code when you segue from one view controller to another. First, you get a bundle and a storyboard. And then call the instantiateViewControllerWithIdentifier() method with an identifier which you give to your view controller you create in the storyboard. It is almost always a good idea to set the identifier to the view controller class name.
But there are two very, very important things happening on the last line:
- Asking for the
viewproperty ofcreateOrderViewControllercauses the view to be loaded. TheviewDidLoad()method is called as a result. - After the view is loaded, all the IBOutlets are also set up and ready to be used in out tests. For example, you can assert that a text field outlet’s text equal to a string you expect.
Let’s go undercover
The CreateOrderViewControllerOutputSpy is very similar to CreateOrderPresenterOutputSpy.
|
1 2 3 4 5 6 7 8 9 10 11 12 13 14 15 16 17 18 19 |
class CreateOrderViewControllerOutputSpy: CreateOrderViewControllerOutput { // MARK: Method call expectations var formatExpirationDateCalled = false // MARK: Argument expectations var createOrder_formatExpirationDate_request: CreateOrder_FormatExpirationDate_Request! // MARK: Spied variables var shippingMethods = [String]() // MARK: Spied methods func formatExpirationDate(request: CreateOrder_FormatExpirationDate_Request) { formatExpirationDateCalled = true createOrder_formatExpirationDate_request = request } } |
When the formatExpirationDate() method is invoked, it records the fact that it is invoked. It also remembers the CreateOrder_FormatExpirationDate_Request argument for later inspection.
The only new thing here is the shippingMethods variable property being spied on. What is a property? It is just a getter method.
When does it expire?
Now that all the boring setup stuff is done, let’s write some tests.
|
1 2 3 4 5 6 7 8 9 10 11 12 13 |
func testDisplayExpirationDateShouldDisplayDateStringInTextField() { // Given let viewModel = CreateOrder_FormatExpirationDate_ViewModel(date: "6/29/07") // When createOrderViewController.displayExpirationDate(viewModel) // Then let displayedDate = createOrderViewController.expirationDateTextField.text XCTAssertEqual(displayedDate, "6/29/07", "Displaying an expiration date should display the date string in the expiration date text field") } |
You first create a view model with the original iPhone release date of “6/29/07”. Then invoke the displayExpirationDate() method with the view model as its argument. Finally, you make sure the expirationDateTextField IBOutlet’s text property contains the same date string.
The displayExpirationDate() method simply causes the expiration date to be displayed in the UI. It doesn’t invoke any method on its output. The flow of control ends here. There is nothing more to do.
In fact, the displayExpirationDate() method is the only method in the CreateOrderViewControllerInput protocol. And you’ve just tested it. But there are a lot more code in the view controller. So, are you done?
Nope. You aren’t done just yet.
You haven’t touched the shippingMethods variable and formatExpirationDate() method in the CreateOrderViewControllerOutput protocol. You certainly want to make sure the view controller somehow invokes them, right? Otherwise, why are they even there?
But the presenter doesn’t call any input methods to trigger them. And the VIP cycle stops at the displayExpirationDate() method. So, who call shippingMethods and formatExpirationDate()?
Introducing Sue Richards – the Invisible Woman
There is the Invisible Woman in the Fantastic Four. There is also an invisible component in Clean Swift.
- V – View controller
- I – Interactor
- P – Presenter
- U – User interface
It turns out there is one other component – the UI – in the VIP cycle. The UI only talks to the view controller and vice versa. It isn’t part of the VIP cycle, but plays an important role. It accepts user inputs such as touches and swipes, and passes these events to the view controller for handling.
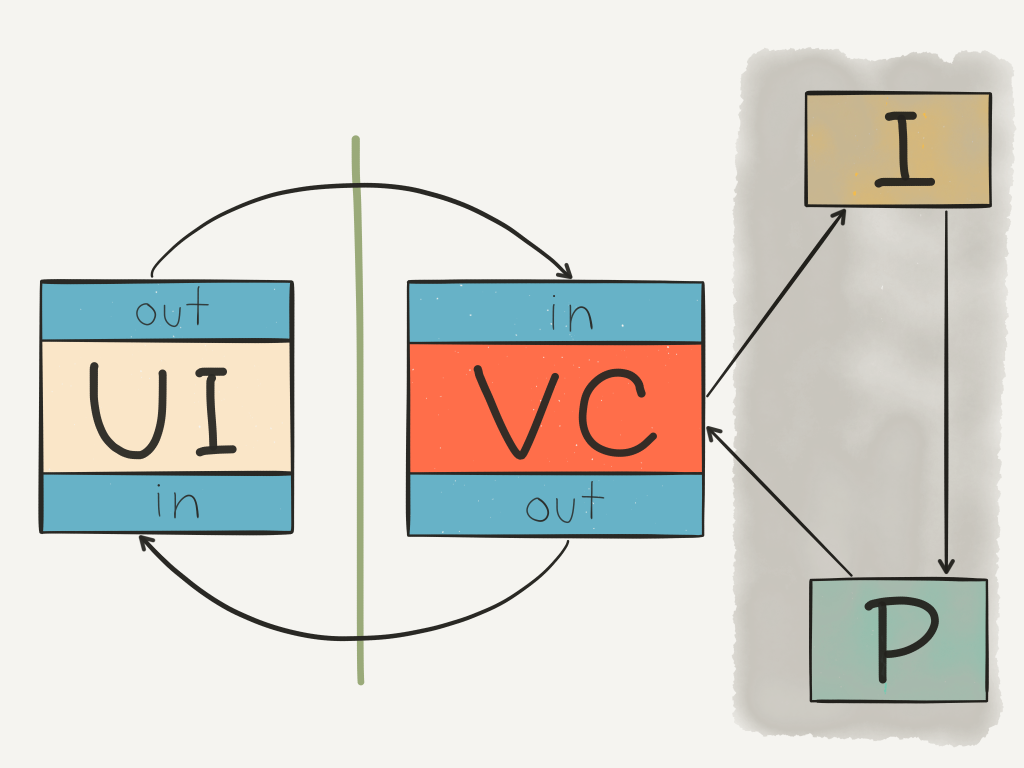
- The green line is the boundary between the UI and view controller.
- The arrows indicate the flow of control: From the UI to the view controller back to the UI.
- The input/output protocol pairs of the view controller and UI constitute the UI/view controller boundary.
Imagine the UI component has its own input and output protocols, and the view controller has another pair of UI-facing input and output protocols.
Think of the IBActions in the view controller are methods declared in the UI-facing input protocol. And IBOutlets in the view controller are variables declared in the UI-facing output protocol.
When the user taps a submit button, the UI invokes the submitButtonTapped() IBAction method in the view controller’s UI-facing input protocol.
When the view controller wants to update the text of a name label, it invokes a setter method named nameLabel.text = “Steve” in the view controller’s UI-facing output protocol.
This “invisible” UI component in the VIP cycle is the key for understanding and writing the remaining tests for CreateOrderViewController.
Picking an expiration date
You’ve now made the invisible UI component visible. You also know IBAction are in the view controller’s UI-facing input protocol. That means you need to test the expirationDatePickerValueChanged() method.
Let’s write the test now.
|
1 2 3 4 5 6 7 8 9 10 11 12 13 14 15 16 17 18 19 20 21 22 |
func testExpirationDatePickerValueChangedShouldFormatSelectedDate() { // Given let createOrderViewControllerOutputSpy = CreateOrderViewControllerOutputSpy() createOrderViewController.output = createOrderViewControllerOutputSpy let dateComponents = NSDateComponents() dateComponents.year = 2007 dateComponents.month = 6 dateComponents.day = 29 let selectedDate = NSCalendar.currentCalendar().dateFromComponents(dateComponents)! // When createOrderViewController.expirationDatePicker.date = selectedDate createOrderViewController.expirationDatePickerValueChanged(self) // Then XCTAssert(createOrderViewControllerOutputSpy.formatExpirationDateCalled, "Changing the expiration date should format the expiration date") let actualDate = createOrderViewControllerOutputSpy.createOrder_formatExpirationDate_request.date XCTAssertEqual(actualDate, selectedDate, "Changing the expiration date should format the date selected in the date picker") } |
First, you instantiate the CreateOrderViewControllerOutputSpy and make it the output of your subject under test. Later, you can ask the spy for the results of the spy mission. You want to make sure a method is called when it is supposed to be called. And it is called with the argument you expect.
How do you invoke the method being tested?
You create an NSDate object of the original iPhone release date of “6/29/07”. Then set it to be the expiration date picker’s date property. Because you set the picker’s date programmatically, the expirationDatePickerValueChanged() IBAction method isn’t called. So you need to invoke it explicitly. The sender argument doesn’t really matter, so you can just pass self.
On to the assertions.
- When the spied
formatExpirationDate()method is called,formatExpirationDateCalledis set to true. So you want to assert that is indeed true. - You then peek inside the
createOrder_formatExpirationDate_requestthat was captured when the method was called. You want to look at the actual date inside the request object and compare it to the expected date.
If both assertions are true, your test case passes.
You’ve just written a test to cover what should happen when the user interacts with the expiration date picker. But there is another picker. What about the shipping method picker?
Picking a shipping method
When the user interacts with the shipping method picker, what methods are invoked to handle these events? Unlike the expiration date picker, you don’t have any IBAction method to handle these events for the shipping method picker.
Fear not. The CreateOrderViewController conforms to the UIPickerViewDataSource and UIPickerViewDelegate protocols. The methods in these protocols work together to handle these events.
Specifically, the CreateOrderViewController implements the following methods:
numberOfComponentsInPickerView()pickerView:numberOfRowsInComponent()pickerView:titleForRow:forComponent()pickerView:didSelectRow:inComponent()
These methods aren’t IBAction methods, but they are delegate methods of the UIPickerViewDataSource and UIPickerViewDelegate protocols. The view controller conforms to these protocols and takes on the responsibility of handling these events. So, these protocols are part of the view controller’s UI-facing input protocols now. This is how the UI communicates to the view controller about events triggered by the user. So you also need to write tests for them.
The UI-facing input protocol of the view controller contains IBAction methods and delegate methods of the protocols that the view controller conforms to.
You just need to remember this simple rule to know exactly which methods you need to write tests for in all your view controllers.
Let’s write these tests now. One by one.
|
1 2 3 4 5 6 7 8 9 10 11 12 |
func testNumberOfComponentsInPickerViewShouldReturnOneComponent() { // Given let pickerView = createOrderViewController.shippingMethodPicker // When let numberOfComponents = createOrderViewController.numberOfComponentsInPickerView(pickerView) // Then XCTAssertEqual(numberOfComponents, 1, "The number of components in the shipping method picker should be 1") } |
First, you grab a reference to the shippingMethodPicker, and then invoke the numberOfComponentsInPickerView() method. Finally, you make sure the number of components is always 1. Kinda boring. But it makes sure there aren’t any extra or missing components in the picker.
|
1 2 3 4 5 6 7 8 9 10 11 12 13 |
func testNumberOfRowsInFirstComponentOfPickerViewShouldEqualNumberOfAvailableShippingMethods() { // Given let pickerView = createOrderViewController.shippingMethodPicker // When let numberOfRows = createOrderViewController.pickerView(pickerView, numberOfRowsInComponent: 0) // Then let numberOfAvailableShippingtMethods = createOrderViewController.output.shippingMethods.count XCTAssertEqual(numberOfRows, numberOfAvailableShippingtMethods, "The number of rows in the first component of shipping method picker should equal to the number of available shipping methods") } |
Again, you grab a reference to the shippingMethodPicker first, and then invoke the pickerView:numberOfRowsInComponent() method to get the number of rows, or choices, of the picker. You want to make sure the number of rows equals the number of available shipping methods so your customers can choose the shipping speed.
|
1 2 3 4 5 6 7 8 9 10 11 12 13 14 15 16 17 18 19 20 21 22 23 |
func testShippingMethodPickerShouldDisplayProperTitles() { // Given let pickerView = createOrderViewController.shippingMethodPicker // When let returnedTitles = [ createOrderViewController.pickerView(pickerView, titleForRow: 0, forComponent: 0), createOrderViewController.pickerView(pickerView, titleForRow: 1, forComponent: 0), createOrderViewController.pickerView(pickerView, titleForRow: 2, forComponent: 0) ] // Then var expectedTitles = [ "Standard Shipping", "Two-Day Shipping", "One-Day Shipping" ] XCTAssertEqual(returnedTitles[0], expectedTitles[0], "The shipping method picker should display proper titles") XCTAssertEqual(returnedTitles[1], expectedTitles[1], "The shipping method picker should display proper titles") XCTAssertEqual(returnedTitles[2], expectedTitles[2], "The shipping method picker should display proper titles") } |
By now, grabbing a reference to the shippingMethodPicker variable should be standard procedure. You invoke the pickerView:titleForRow:forComponent() method three times because there are three available shipping methods. The assertions simply perform some string comparisons to make sure the correct shipping methods are displayed to the customers. You don’t want to promise one-hour delivery!
|
1 2 3 4 5 6 7 8 9 10 11 12 13 14 |
func testSelectingShippingMethodInThePickerShouldDisplayTheSelectedShippingMethodToUser() { // Given let pickerView = createOrderViewController.shippingMethodPicker // When createOrderViewController.pickerView(pickerView, didSelectRow: 1, inComponent: 0) // Then let expectedShippingMethod = "Two-Day Shipping" let displayedShippingMethod = createOrderViewController.shippingMethodTextField.text XCTAssertEqual(displayedShippingMethod, expectedShippingMethod, "Selecting a shipping method in the shipping method picker should display the selected shipping method to the user") } |
It’s the shippingMethodPicker variable again! When you invoke the pickerView:didSelectRow:inComponent() method for the second row, you want to make sure the shippingMethodTextField’s text property is set accordingly.
Since you’ve already tested the three shipping method titles are properly displayed in the last test, you can just call the pickerView:didSelectRow:inComponent() method once here. You are testing strings in your last test, and the mechanism in this test.
A few words about writing trivial tests
As you can see, the implementation of these picker view delegate methods are very trivial. Do you really need to test a method that always returns 1?
I personally don’t really have a preference. Some people think they are important while others think they are a waste of time. But since they are so simple to implement and test, how much time do they actually waste? Not much at all. They do have some benefits down the road.
What if you need to display a different set of available shipping methods to customers with a Prime account? You’ll have to change the implementation. At that time, it’ll be nice to already have some tests to show what the picker is supposed to do. When you make the new changes, the tests will fail and let you know why.
If you are new to writing tests, it is best to write these simple tests. They serve as good practices and give you the early wins to generate some momentum.
That’s it for part 1. Stay tuned for part 2. You may want to review the Clean Swift architecture before next week’s post.
You can find the full source code at GitHub.
I learned a lot from your article, just want to thank you, great work.
And I found a problem, when I followed your code, the “let bundle = NSBundle(forClass: self.dynamicType)” won’t compile because the compiler can’t find my “Main” storyboard. So I just changed the bundle to nil, and it worked.
Hi Andres,
Thank you for the nice words! The answer to your question is yes. In fact, I already updated the Xcode templates to simply get a storyboard from the main bundle.
I first implemented my ViewController as you do here and had no problem for the tests, but then I tested the VC in my app and found that it was very slow to update the table: it would take a long time between the calls of numberOfRowsInSection and cellForRowAtIndexPath.
I search a bit on what could be the problem and it would seem that forcing the update to be done in the main thread would solve the problem so I changed accordingly the program:
dispatch_async(dispatch_get_main_queue(), tableView.reloadData)
This of course broke some of the tests.
I have been able to repair the test the verify that reloadData is called by using an expectation like you do in one of your examples, but I didn’t find how to repair the tests that verify that a label text has been correctly set as the test seems to end always before the text is updated.
One possible thing would be make the test wait for 1 sec or 2 but that would give me a test that can pass or fail depending on the time the view will take to update the text and I wonder if there is no other solution.
Would you know something about this problem?
Hi Yoann,
Yes, calling the completion handler in the main thread from the
OrdersWorkerwill fix the slowness issue. I’m making a lot of updates to the CleanStore app that will have a new scene and all passing tests.Stay tuned.
I’ll wait for your updates if I do not find something for the non passing tests. Thank you!
I don’t like it such approach we are obligated in following your patterns named “clean swift” and it can’t explain how can I use it on my own generic project that btw doesn’t follow any of these.
My problem is I cannot simulate the hook components, they are all nil and this article won’t help me on solving that.
Hi Jose,
I didn’t strive to solve your generic app… But you can apply the same concepts to any project in any language on any platform!