
I’ve written a book to teach you how to write unit tests effectively. If you want to make your tests fast so you’ll actually run them and run them often to receive immediate feedback, check out Effective Unit Testing. You’ll develop the confidence that your change will not break existing features, and never have to worry about introducing regression. Write non-fragile unit tests that are assets, not liabilities. Use TDD to write testable code that drives feature development.
In my original post on Clean Swift iOS architecture, the CleanStore example app had only one scene and very little business logic. There wasn’t another scene to segue to.
In this post, you’ll add a new ListOrders scene to list the user’s orders. The user can tap a + button to segue to the CreateOrder scene you built earlier.
You’ll learn how to drive this new feature using Test Driven Development (TDD).
Design the UI
In an iOS app, without the user interface that the user can interact with, there’ll be no need for any business logic. When implementing a new feature using test driven development, it is a great idea to build the UI first.
Start by creating a new scene using the Clean Swift Xcode templates:
- In the Project Navigator, under the Scenes group, create a new group named ListOrders.
- Under this new group, create a new file and choose Clean Swift, then Scene.
- Enter ListOrders for the New Scene Name.
- Choose UITableViewController for Subclass of.
- Create a new folder named ListOrders to put the new scene in. It’s nice to match the filesystem and the groups in Xcode so you don’t end up having all of your files in the project root.
- Remember to check the CleanStoreTests target.
Next, create a new table view controller in storyboard:
- Embed the new table view controller in a navigation controller
- Make the navigation controller the new initial view controller in the Attributes Inspector.
- In the Identity Inspector for the new table view controller:
- Enter ListOrdersViewController for Class.
- Enter ListOrdersViewController for Storyboard ID.
- Check the Use Storyboard ID check box under Restoration ID.
- Design the table view:
- Give the new table view controller a title named Orders.
- Add a new
UIBarButtonItemin the right position of the navigation bar and choose Add for System Item. The button should turn into a +. - Choose Right Details for the table view cell style.
- Enter OrderTableViewCell for the table view cell identifier.
- Create a Show segue named ShowCreateOrderScene from the new bar button item to the CreateOrderViewController.
Your storyboard should now look like:
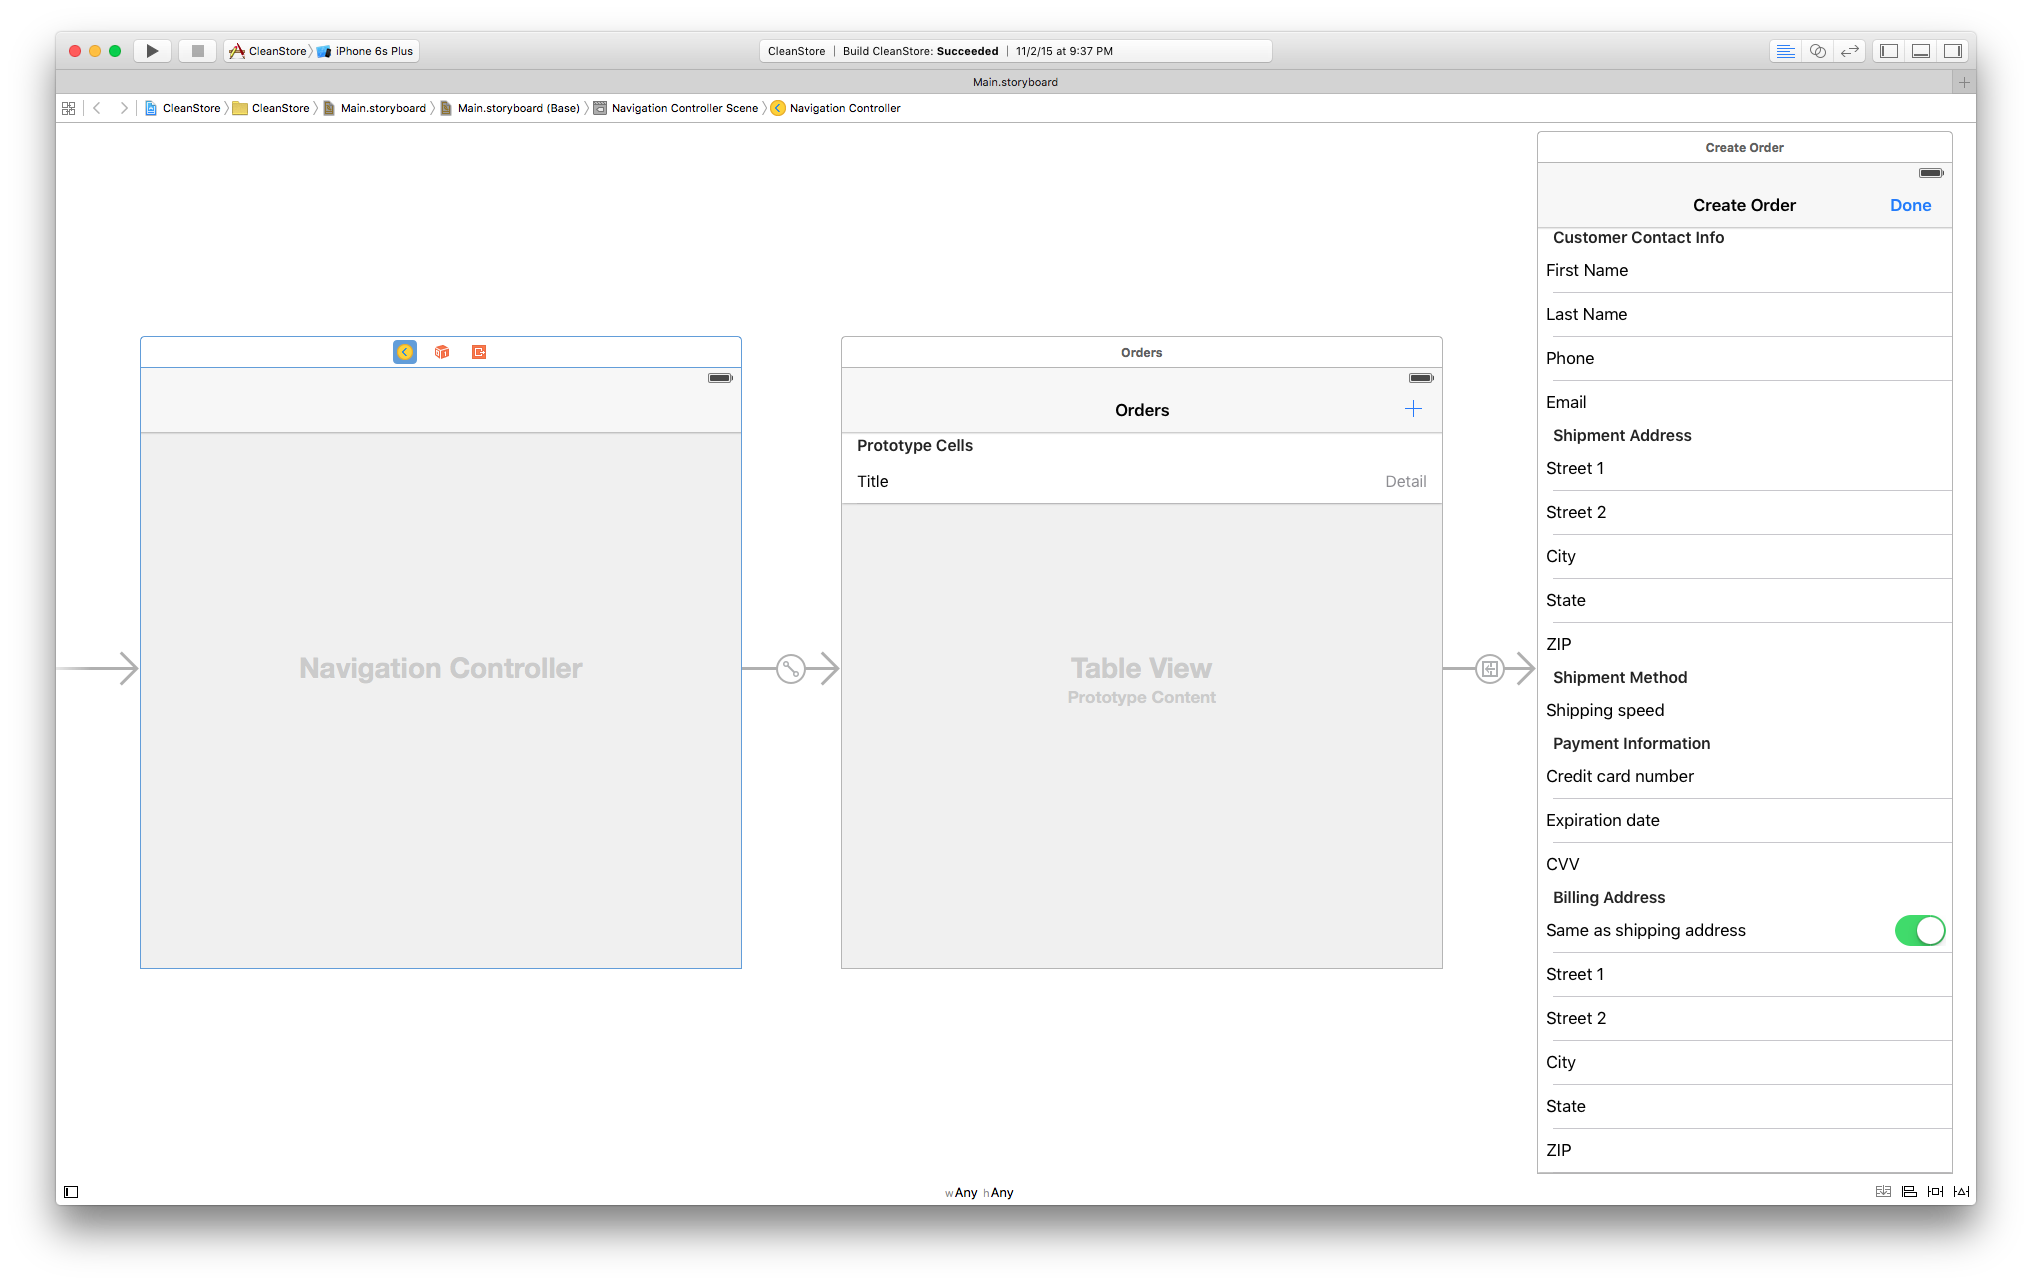
Make sure both your storyboard file and scene files are checked for the CleanStoreTests Target Membership in the File Inspector. This is necessary for your tests to see your classes and instantiate a view controller from the storyboard.
Build and run the app to make sure everything is hooked up correctly. You should see the ListOrders scene as the first screen. When you tap the + button, you should see the CreateOrder scene you built before.
Create the unit tests
You can use my Clean Swift Xcode templates to generate the unit test files to save you a lot of typing. The templates generate unit tests for the view controller, interactor, presenter, and worker. All the common setup and teardown is done for you, so you can start writing your tests using test driven development immediately.
- In the Project Navigator, under the Scenes group, create a new group named ListOrders.
- Under this new group, create a new file and choose Clean Swift, then Unit Tests.
- Enter ListOrders for the Scene Name.
- Create a new folder named ListOrders to put the new unit tests in.
- Check only the CleanStoreTests target. Unit test files should not be visible to your application test target.
Now you should see the following new unit test files in your project:
ListOrdersViewControllerTests.swiftListOrdersInteractorTests.swiftListOrdersPresenterTests.swiftListOrdersWorkerTests.swift
What should you test first?
Where should you start first? View controller? Interactor? Presenter?
What should you test first when you do test driven development?
When the ListOrdersViewController is loaded and shown to the user, you want to show the orders to the user as soon as possible. So in the viewDidLoad() method, you want to ask the interactor to fetch some orders. That seems like a great place to start. After all, a mobile app is largely driven by user interaction.
So let’s write a test to make sure you invoke a hypothetical method named fetchOrders() inside viewDidLoad().
Isolate the dependencies
Let’s walk through what you are trying to accomplish using test driven development.
You want to fetch the list of orders when the view is loaded so the user can see them as soon as possible. Fetching orders is business logic. So you want to ask the interactor to fetch the orders in viewDidLoad().
Remember, you are testing the ListOrdersViewController, so you don’t really care what ListOrdersInteractor does after you ask it to fetch some orders and how it does so.
From the point of view of the ListOrdersViewController, it doesn’t even know it’s talking to an interactor. It just needs to know it’s talking to an output that conforms to the ListOrdersViewControllerOutput protocol.
Let’s isolate this component dependency by creating the ListOrdersViewControllerOutputSpy.
|
1 2 3 4 5 6 7 8 9 10 11 12 |
class ListOrdersViewControllerOutputSpy: ListOrdersViewControllerOutput { // MARK: Method call expectations var fetchOrdersCalled = false // MARK: Spied methods func fetchOrders(request: ListOrders_FetchOrders_Request) { fetchOrdersCalled = true } } |
You’ll also want to isolate data dependency. So, add the ListOrders_FetchOrders_Request model to the ListOrdersModels.swift file. Leave it empty because you just want a list of orders for now. No search or sort criteria.
|
1 2 3 4 |
struct ListOrders_FetchOrders_Request { } |
Write the test first
Next, write the testShouldFetchOrdersWhenViewIsLoaded() test.
|
1 2 3 4 5 6 7 8 9 10 11 12 13 |
func testShouldFetchOrdersWhenViewIsLoaded() { // Given let listOrdersViewControllerOutputSpy = ListOrdersViewControllerOutputSpy() sut.output = listOrdersViewControllerOutputSpy // When loadView() // Then XCTAssert(listOrdersViewControllerOutputSpy.fetchOrdersCalled, "Should fetch orders when the view is loaded") } |
First, you substitute the actual ListOrdersViewController output with the ListOrdersViewControllerOutputSpy you just wrote.
In order to load the view to be ready for testing, call loadView() to add the view controller’s view property to the view hierarchy of its root window.
The loadView() method is pretty simple:
|
1 2 3 4 5 6 |
func loadView() { window.addSubview(sut.view) NSRunLoop.currentRunLoop().runUntilDate(NSDate()) } |
Now, you simply need to assert that the fetchOrders() method was indeed invoked.
Draw the boundary
Next, hook up the fetchOrders() method in the boundary between ListOrdersViewController and ListOrdersInteractor. Add the fetchOrders() method to the ListOrdersViewControllerOutput and ListOrdersInteractorInput protocols.
|
1 2 3 4 5 6 7 8 9 10 |
protocol ListOrdersViewControllerOutput { func fetchOrders(request: ListOrders_FetchOrders_Request) } protocol ListOrdersInteractorInput { func fetchOrders(request: ListOrders_FetchOrders_Request) } |
For now, just add an empty implementation of fetchOrders() in ListOrdersInteractor. You just want to make sure the view controller asks its output to fetch orders. You don’t care what it does just yet. You’ll TDD that method when you write tests for ListOrdersInteractor.
|
1 2 3 4 |
func fetchOrders(request: ListOrders_FetchOrders_Request) { } |
The essence of test driven development is to write as little code as possible until it becomes necessary. An empty fetchOrders() method is needed to satisfy the protocol conformance check by the compiler.
Implement the logic
Back to the view controller test. Your test currently fails because you haven’t implemented the use case yet. Let’s make it pass now.
Add the fetchOrdersOnLoad() method to ListOrdersViewController and invoke it in viewDidLoad(). Inside fetchOrdersOnLoad(), invoke fetchOrders() on the output.
|
1 2 3 4 5 6 7 8 9 10 11 12 |
override func viewDidLoad() { super.viewDidLoad() fetchOrdersOnLoad() } func fetchOrdersOnLoad() { let request = ListOrders_FetchOrders_Request() output.fetchOrders(request) } |
I prefer putting the actual task inside a private method because:
- There are likely many tasks you want to perform in
viewDidLoad()in the future. You don’t want to lump all of that inviewDidLoad(). - The method name
fetchOrdersOnLoad()gives a descriptive meaning to the actual task.
Run your test again to see it pass. Test driven development is fun, right?
You can find all the code and tests on GitHub.
Recap
Let’s recap what you’ve done so far using test driven development with Clean Swift.
- You isolated the dependency on the
ListOrdersInteractorcomponent by creating theListOrdersViewControllerOutputSpy. - You wrote the
testShouldFetchOrdersWhenViewIsLoaded()test to verify orders are fetched when the view is loaded. - You implemented an empty
fetchOrders()method inListOrdersInteractor. This is good because it gives you a hint for what to test and implement next. - You finished the implementation by adding the
fetchOrdersOnLoad()method and invoking it inviewDidLoad()to make the test pass.
In the next post, you’ll implement ListOrdersInteractor’s fetchOrders() method and create an OrdersWorker to handle the CRUD business.
Great post.
Have you updated the templates to add the unit test yet? I don’t see this as a selection from the files downloaded from gumtree.
Yes, I updated the templates, but forgot to upload them to Gumroad. I just fixed that.
If you’ve downloaded the templates before, you should already received an email about the update. If not, let me know.
Ray,
Great Post, eagerly waiting for your future posts.
Have a question, why are you suggesting all the projects files to be included on the test target. You could use ‘@testable import CleanStore’ on the test swift file to make it visible in the test target to perform the testing.
I am aware of the new
@testablething Apple introduced this year. It has something to do with the access modifiers – public, private, internal. I haven’t had time to look into it yet. But it surely looks good. Can you try that and uncheck the test target for your application files and let me know if it works?Using @testable is the preferred method now. Regardless of the access level of functions in your Swift file, ALL your functions are available to your test classes.
Whether you agree this is right or not, it does mean you don’t have to add your files to the tests target which is more agreeable.
Hi Paul,
I agree. The tests in the CleanStore example project now uses
@testable. I think it’s a great feature.Hi , i have been following your post to apply Clean Swift TDD, but actually i got a problem trying to isolate each kind of test. Because how i can see, is always needed a ViewController to init all the configuration after the awakeFromNib. Is there any other way to do TDD starting only at the presenter, skipping the view controller configuration … without alter all the test cycle?
Thanks!
Hi Alejandro,
You can certainly test your presenter in isolation without instantiating your view controller.
The following test code simply instantiates the subject in test, which is the presenter. There is no view controller involved. You can see the full source here.
Also, since the presenter’s
outputisCreateOrderPresenterOutput, notCreateOrderViewController, and you can simply mock it in your tests. The view controller is again not involved.Therefore, testing your view controller, interactor, presenter, worker are completely isolated from one another due to the input/output protocols and the Dependency Inversion Principle.
Surely a good post to get one started with TDD in Swift. However having a separate code for each part of your TDD series would greatly help instead of sharing a link for single completed project on git hub.
Hi Akash,
I understand what you mean.
I tried to show the step-by-step solutions in the blog posts. They all go in the same project code base as it evolves. I thought about documenting each step as a separate commit. But that would cost way too much time for me.
I recently ran a workshop to teach Clean Swift and used some pre-recorded screencasts. It went well based on the feedback. I may start making more screencasts and run other workshops in the future.
Hi Raymond,
Recently came across your tutorials love the content.
If possible would you be able to record one of your workshops and posting it on youtube maybe, I believe this will extremely helpful in grasping some concepts.
Hi Raymond,
I’m using SwiftLint to force clean and correct Swift coding. Howerver, one of the rules of it states that
IBOutlets should be private to avoid leaking UIKit to higher layersIf I do so, I cant access the tableView in my Test Class… What should I do to conform to this convention and at the same time have access to the tableView so i can set sut.tableView = tableViewSpy ???
Hi Fred,
I agree that IBOutlets should stay in the view controller. This should be common sense for any developer reading this blog. So I wouldn’t try to enforce this rule by putting the
privatekeyword there, especially if it inhibits your ability to test.My belief is that if your app architecture is sound, you write code with these best practices in mind, you don’t need the programming language to enforce any rule. You should do the right thing even without these rules in place. If someone is less experienced, he’ll break them no matter what. He would remove your
privatekeyword if he really need to get something done but can’t without removing it.So, cultivating a clean code culture in your team is a much better way to go. Teach instead of enforce.
Thanks for your reply Raymond, I see your point. However I would not like to stray from either CleanSwift nor SwiftLint, so I guess my best option here would be to create a mock class to expose the privates, right?
Hi Fred,
I don’t really use the access modifiers in Swift much. So I’m not sure what you need to do here.
Clean-Swift is pretty cool but very complicated.
I can see from the tutorial that you guys are good with complicated stuffs, because even the tutorials is complicated 😀