When TDD started to gain popularity, it felt like a virus, a contagious one. Suddenly every developer started to write tests for their code. But just like a virus outbreak, nobody really knows exactly what to do? Do I have to write tests for every single method in my app?
- Do I need to test this network call? What if the API goes down? My tests will fail!
- What about this init call? It is just assigning initial values to some variables. Isn’t that too trivial to test?
- This method is 138 lines long, doing 5 different things, with 12 possible edge cases. Do I write 12 tests for this one method? Or just one test case to cover them all?
- I just changed this one line and 34 tests broke. Now I just added 34 things to my todo list. My tests are fragile!
Thanks TDD, but no.
Does this sound familiar to you?
I found myself spending more time to fix my broken tests than writing code that do meaningful work. I couldn’t really see the value TDD was supposed to provide. I even felt like I was fabricating the tests just to make them pass. I eventually lost confidence in them. And my interest in TDD waned.
But TDD does seem like a good thing
Does it have to be this way? Why do all the great programmers like Uncle Bob and Martin Fowler swear by TDD? They certainly found its benefits. They wouldn’t have done it otherwise. Are they just born inhumanly tolerant of broken tests?
Over time, I learned that I didn’t have to play slave to my tests. I learned to be master of them. And to answer the original question. No, you do not have to write tests for every method.
You only have to write tests for the boundary methods. That’s one of the biggest takeaway I got from watching all of Uncle Bob’s talks on Clean Architecture I could find.
I have applied these same techniques to iOS apps. As a result, I find testing much more enjoyable. Most importantly, I now have confidence in my tests to tell me when I break something. Tests become simpler to write too.
TAD – Test After Development
When we developed CleanStore in my last post on Clean Swift, I jumped right in and started implementing features without writing any test first. I wanted to focus on showing you how Clean Swift works. So I skipped the testing part. Now it is time for us to add those missing tests back in.
You’ll also use the different kinds of test doubles you’ve already seen to decouple dependencies and isolate the SUT – subject under test.
What you’ll see here is not TDD, but rather TAD – Test After Development.
Although TAD doesn’t bring the same values as TDD, you still have some confidence about your code with TAD than without. But you don’t have a LOT of confidence as in TDD.
So, why do we bother with TAD? Let’s face it. We’ve all written untested code, have to deal with untested code written by someone else. Some clients may be unhappy with a previous developer and come to you to rescue their projects. Working with existing code, good or bad, is just a matter of life at some point in a developer’s career.
It’s far easier to add the tests back in now that our CleanStore app is still in its infancy. That’ll get us back to TDD-ready. If you were to continue development and ignore testing, the technical debt will accumulate to the point of no return.
After reading this post, you’ll learn what methods you need to write tests for and where these methods are. You’ll be able to examine your existing code and know what to test. It’s the first step to paying off your technical debt and re-instill confidence in your code.
Let’s TAD it on!
What methods should you test?
Even in a small project like CleanStore, there are already many places you can write tests for. Where should you start?
As I explained at Stack Overflow, in the Clean Swift architecture, you should only need to write tests for the boundary methods. You don’t test private methods.
The reason is simple. As the famous Uncle Bob pointed out, the primary goal of a clean architecture is to allow you to make changes with confidence. There are three types of changes:
- Add a new feature
- Improve an existing feature
- Fix a bug
I’ll talk about how to use TDD to drive a new feature in a future blog post.
So, you’ve implemented a feature or two. And the client wants to add/change related business rules. Or, the QA team finds a bug. In both cases, you’ll need to change the existing implementation.
When the user of a component interacts with it by calling a method in its input protocol, one of two things may happen:
- The method performs all the business logic, and finishes.
- The method invokes one or more private methods to perform all the business logic, and finishes.
The private methods are never invoked from the outside. As long as you test all the methods declared in the input protocol, all the private methods are guaranteed to be invoked at some point. You should be covered.
Since methods declared in the input and output protocols live in the boundary between components, we have a special name for them – boundary methods.
Now, the question becomes:
If we test all the boundary methods and not private methods, can we make changes easily? Yes, of course. We can change the private methods any way we want. The tests we have written for the boundary methods will invoke the private methods during their execution. If we make a mistake in the private methods, the tests will fail and let us know.
Where are these boundary methods?
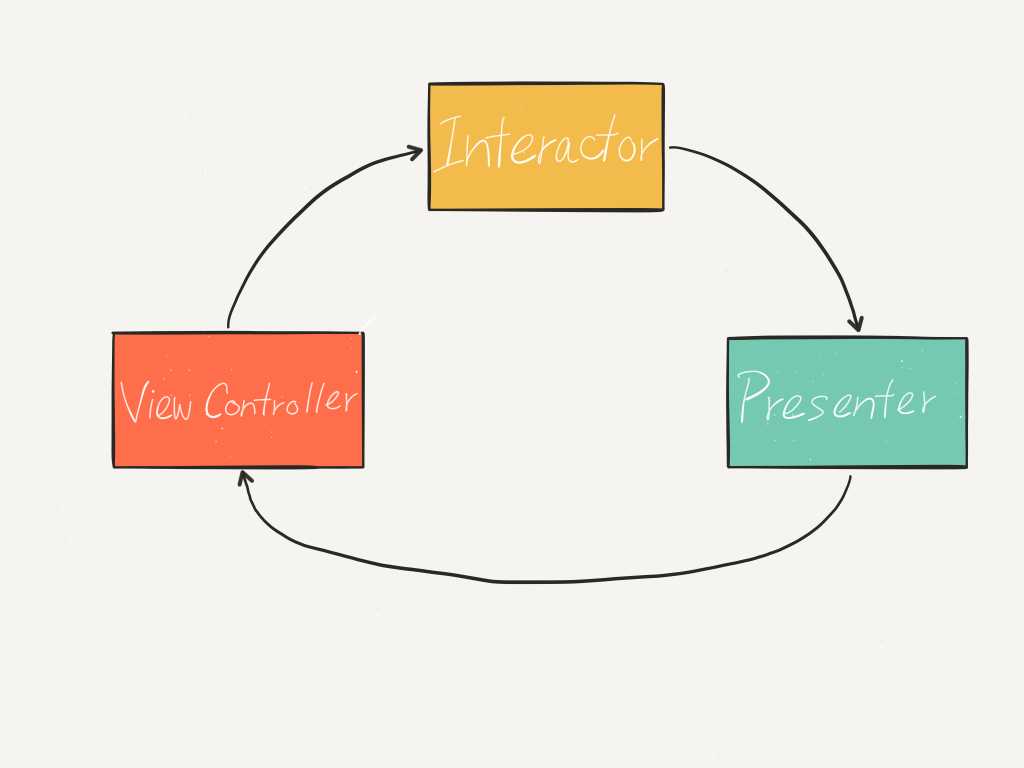
Recall the VIP cycle.
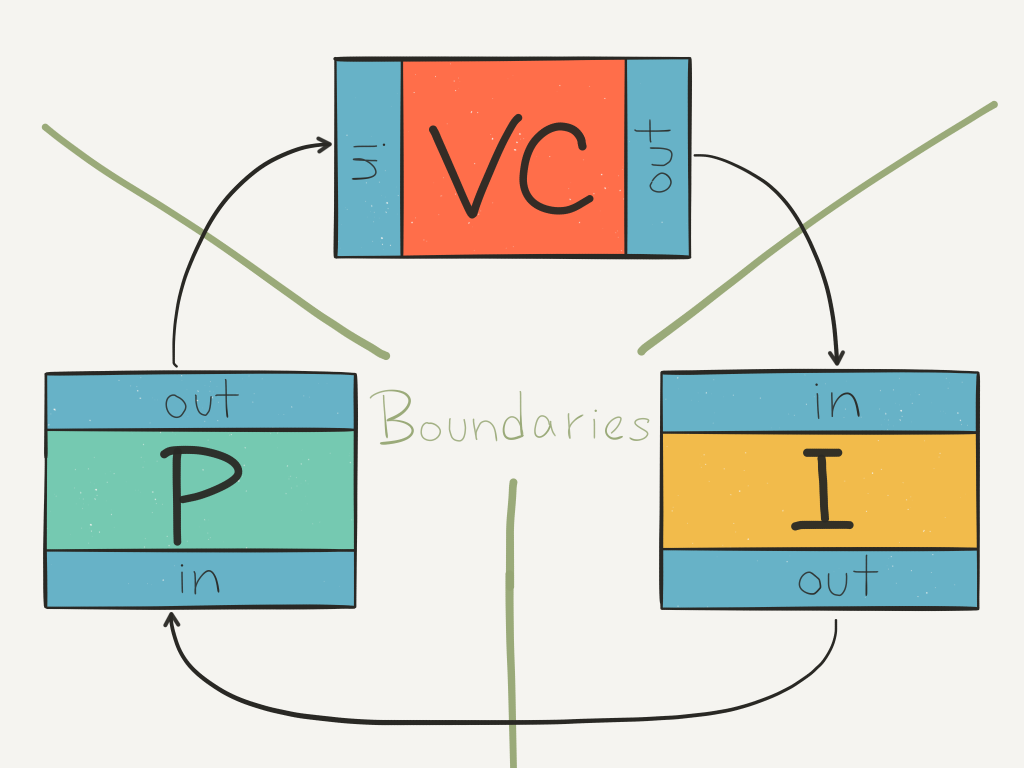
Let’s revise it to also show the input and output protocols.
- The green lines are the boundaries.
- The arrows indicate the flow of control: From view controller to interactor to presenter back to view controller.
- The methods declared in the input and output protocols are the boundary methods.
When I discussed Clean Swift, I mentioned the output variable is an object that conforms to the output protocol, rather than a direct instance of another class.
When a component passes control to the next component, it invokes output.doSomething(). The doSomething() method is declared in both the output protocol of the calling component and the input protocol of the called component.
This all comes down to something really simple when you are writing tests in Clean Swift:
When testing the boundaries of a component, we just need to invoke the methods declared in its input protocol, and make sure it calls the methods declared in its output protocol.
In Clean Swift, all your boundary methods are listed at the top of the file under explicitly named protocols such as CreateOrderInteractorInput and CreateOrderInteractorOutput. You don’t need to look elsewhere!
In my next post, you’re going to see a real example. I’ll show you step-by-step how to write your first test for CreateOrderInteractor. Make sure you subscribe so you don’t miss it.


I just read a really good post explaining testability and what to do if you struggle thinking about testing public vs private methods.
Testability Tip for Swift Developers – Public Over Private
Andrew even has some suggestions on what to do if this becomes a big problem in your code. He suggests moving a bunch of private methods into a new type. Those methods should then be made public for the user of that new type. I completely agree. This is a good indication of further breakdown is necessary.
Raymond, can you tell more about the below question.
This method is 138 lines long, doing 5 different things, with 12 possible edge cases. Do I write 12 tests for this one method? Or just one test case to cover them all?
Hi Randy,
That was a hypothetical question. But…
If you use the Clean Swift approach from the beginning, you’ll not end up with a method with 138 lines, doing 5 different things. Instead, you’ll have many short, single responsibility methods, each doing one thing. And you’ll get this naturally without having to proactively refactor.
But let’s say you inherit an app with this monster method. The first thing not to do is to write tests for it. You’ll not enjoy it, and you’ll throw the tests away anyway.
Instead, you want to read and understand the method as much as you can to identify its many responsibilities. Also discuss with the stakeholders to make sure your understanding is correct.
Next, re-implement them using Clean Swift so that the responsibilities are broken up into multiple small methods. You can easily write tests for these methods.
When you finish, you can throw away that monster.